I started with the darts; back and front.
Inside of the back dart
Outside of the back dart
Outside of the front dart
Then I sewed the 2 back panels together
Not too bad so far. The only "snag" I have run into thus far is what ever material this is, the edges are fraying pretty bad and at one point while sewing the back panels together, the fuzzies got caught up with the thread in the needle and the top thread broke. So I remedied the jam, re-threaded and continued.
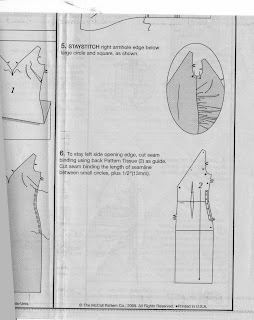
Next I put 2 gather stitches on each side of the front panel and also stay stitched the bottom of the V neck area. (Sorry no pictures of that... kinda routine/boring/normal. But how about a scanned pic :) )
And lastly I pulled the right front side gather stitch and then stitched it to the right back side.
And that is what I have done so far. The only thing I am not too trilled with is the gather. Mine is not as rouchy (sp?) as I could like it to be, nor as what the photo and direction pictures look like... but other than that still trucking along.
Although I have glanced ahead on the directions and I am not really sure what the next step (step 6) means. (It says; "to stay left side opening edge, cut seam binding using back Patter Tissue [2] as guide. Cut seam binding the length of seamline between small circles, plus 1/2".)
Anyone have any clues?


3 comments:
this is aaaawesome!!! Can't wait to see the finished product. :)
You should do a big zig zag stitch along the edges of your fabric to keep it from fraying. Or, if you have a stitch on your machine that gives the serger type look, you can use that.
As for that next step, I believe you are cutting a strip to use at the bottom of the armhole. I am trying to look between the instructions and the pictures - it appears to have a little cap sleeve that only goes part of the way around the armhole. The binding mentioned here will finish off the bottom part of the armhole so you don't see all of that fraying fabric! You have probably moved past this by now, though!
Hi - I'm making this dress now and got stuck exactly where you have - did you ever get past this step?
thanks for all help!
Post a Comment