Showing posts with label sewing. Show all posts

Saturday, October 30, 2010

Sadly Delinquient ...oops!

Okay wow! I can't believe it's been since the spring since I've posted. Well for the last 2 months I have been in full sewing swing because I will be doing my first craft show next weekend!


If you're going to be in the Dallas/Ft. Worth area next week, stop by and shop a little! :)
Here are some things that I have been working on.
The Amy Bag

Turquoise Rosette Hair Tie

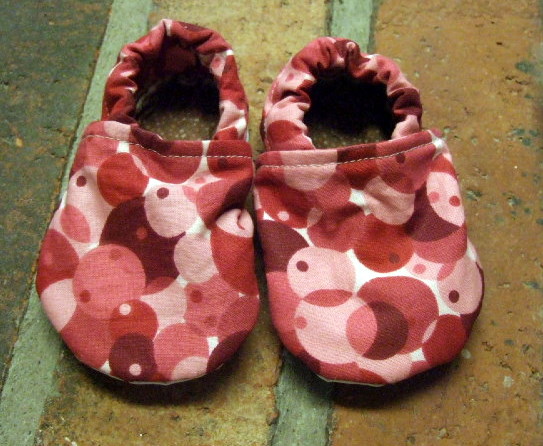
Baby Shoes

Ang Bag

Jenn Purse
Turquoise Rosette Headband

Bib & Burp Cloth

Nursing Cover... a friend of mine suggested I call them Boobie Blankets.... I don't know if I can do that with a straight face!

Diaper Cover as modeled by my bear :)

Embroidered Pillow

Lindsey Purse

Ang Bag

White Rosette Headband

Wednesday, April 7, 2010

Progress? I don't think so...

So I know it's been a LONG time since I have posted anything about sewing the Butterick 5383 and that's because it's been a long time since I have sewn anything on it :) I lost my sewing mojo for a while.... but I am still not quite sure it is back :S

So here is the update..... PROBLEMS GALORE! Really if you know anything about clothing construction, now would be the time to chime in :) because I am stuck at what to do next and I don't know if i can go back either... so here's the damage...

After some friendly advice from the Joann lady I figured out what the staystitching thing was all about, so I got that in there just fine.


Then I proceeded to the invisible zipper with not too much fuss. (Even though I don't have that invisible zipper block foot thing, I managed with my regular zipper foot.)


Then I had a "tube" of a dress if you will, so I decided to try it on before going any further.... here is  where the flying bird gets plastered by the car going 75mph....


Oh dear where do I start! There is so much floppy fabric in the front where it's ruched (sp?)... and because I obviously over ruched the front is TOO SHORT! (Like way too short...) The hips are pretty snug, like afraid to sit down snug and the back above the rump is very fabricy too...

Now I don't know what to do. To go back and un-ruch some of the side would mean A LOT of ripping out stitches and ripping out the zipper. And even if I did that I am not sure if that would afford me more room in the hips too...

Help someone who knows better than me!!

Wednesday, March 17, 2010

Funky Find New Hat

I went this weekend up to Fort Worth to check out an indie craft fair I found out about through etsy.


It was pretty good. It was super small compared to what I was used to going to back in the day when my mom did bazaars at the Camplex. I wanted to check it out because I am thinking about entering a booth next year. That would be totally exciting and I would have to get a lot of products made!
I met up with my grandma and we perused the 2 aisles. There was a lot of super cute stuff! (Also a lot of things that would not interest me :) ) I could have bought a lot, but since handmade is always a little more costly than retail (unfortunately) I only bought one of the many things I was eying. Behold my new hat!!

Saturday, March 6, 2010

I need YOU!!! ... to vote

As once again I am crafting and now I have run into an impasse... Do I go with version 1...


Or version 2...


The background fabric is baby blue linen and the accents are gray canvas. Alright please help me by leaving your input in the comments!!!

Saturday, February 20, 2010

Saturday Clean-up

So today I decided to take a little break from the dress sewing and try to clean up the sewing room and improve it's look a tad bit. I filed away all the scattered patterns everywhere and then decided to take care of the dilapidated ironing board.

 
See the yucky stain, ugly denim color and rotary cut right down the middle? (I had a mental brain lapse many months ago and cut something on the ironing board with my rotary cutter... I know, I know!)

The fabric I had that I wanted to use was wider than it was long, so I took the liberty of sewing it together length wise. I figured it was just an ironing board, no one is going to care if there is a seam down the center :)

 
Then I took the string out from the old cover and saved it to use later :) Next I traced out the old cover onto the new fabric.


I pressed an approximately 1/2" seam all the way around and then I sewed the string casing. (I was lazy since the underside is never seen I didn't finish the fabric edge.)
Then tied the string off onto a safety pin and feed it through.


Then put the finished product onto the board frame. Easy as that!! And I must say it looks a whole lot better too! :)


DIY Day @ ASPTL

Wednesday, February 17, 2010

First day of sewing - Butterick 5383

Ok so I gathered my courage and put my (skinny size 60) needle to fabric.

I started with the darts; back and front.
 
 Inside of the back dart

 
Outside of the back dart

 
Outside of the front dart

Then I sewed the 2 back panels together


Not too bad so far. The only "snag" I have run into thus far is what ever material this is, the edges are fraying pretty bad and at one point while sewing the back panels together, the fuzzies got caught up with the thread in the needle and the top thread broke. So I remedied the jam, re-threaded and continued.

Next I put 2 gather stitches on each side of the front panel and also stay stitched the bottom of the V neck area. (Sorry no pictures of that... kinda routine/boring/normal. But how about a scanned pic :) )
 

And lastly I pulled the right front side gather stitch and then stitched it to the right back side.


And that is what I have done so far. The only thing I am not too trilled with is the gather. Mine is not as rouchy (sp?) as I could like it to be, nor as what the photo and direction pictures look like... but other than that still trucking along.
Although I have glanced ahead on the directions and I am not really sure what the next step (step 6) means. (It says; "to stay left side opening edge, cut seam binding using back Patter Tissue [2] as guide. Cut seam binding the length of seamline between small circles, plus 1/2".)


Anyone have any clues?

Tuesday, February 16, 2010

My first grown-up article of clothing.... aka a sewing adventure....yikes!!

Ok, so I have decided to blog through my first clothes sewing adventure. I hope I have not gone in over my head with this first one. We will all find out!!

So here is the dress I am making... Butterick 5383

  
This is the fabric I chose, and I hope it works because it was not one of the fabrics recommended on the pattern. Butterick recommended Stretch Wovens, Ponte Knits and Jersey. All of which I have no idea what they are! (I suppose I better learn these things if I am going to start sewing my own clothes!!) (Side note, I have been reading Dawn for many weeks now and hope to make beautiful clothes like hers one day!!)

So I have done a tissue fitting just like Gertie has instructed me to! 

(And P.S. I can only hope that someone who knows how to sew is reading this because then they can stop me at every point and say "WAIT!! You are making a huge mistake doing A... It is supposed to be done in manner B." So if you are out there and reading please speak up and offer all sorts of advice and knowledge!)

Here is what I found out during my tissue fitting. I definitely need to move into the real world and just buy the pattern based on what the measurements say on the flap!! I am a buying clothes size 12, but definitely not a size 12 is sewing measurements! So here is what I changed;

1. I added 2 inches to the shoulder length because the arm opening was squeezing the life out of my armpit.


2. I added 2 inches to the front and back because I should have bought a larger pattern size!! Which automatically added 1.5 inches to the neck line. (I don't know how I would have been able to prevent this.....)


3. Since I lengthened the shoulder strap on the dress by 2 inches I also added 2 inches in the neck binding. And I also added 1.5 inches because I lengthened the neck when I widened the dress. (This part threw me for a loop for a long while and I starred at this pattern piece for a long time before I cut and decided what to do with it!!)


4. Finally I added the adjustments to the inside lining pieces as well.


So after all this I measured many many times and then cut the fabric... I was a little nervous I must admit! (I know the bottom hem is not straight, but I actually didn't cut it, I left it from the original fabric in case I need more hem. I am going with the longer B version of the dress because I am so tall, it actually hits me at the knee. So I left the crocked bottom just in case :) )


So I think that's all so far! I am going to go into my sewing room and stare at my cut outs and try to get the courage up for putting a needle in them!! (Reminder to self..... change the huge needle in your machine from 90 to 60...)

Here I go...